Take Your Pick - Insulin Delivery Methods
Introduction:
Caring for type 1 diabetes comes in many different forms and there is not one set way that works for everyone. Personally, I have tried a variety of different methods that I have tried and experimented with. All of the methods that I mention in this post I have personally used. The main point I want to get across here is that until you have your body figured out, it is all trial and error. And trust me, there will be A LOT of error at the beginning. The important thing is that you don't get discouraged and simply try new methods until one clicks. My goal with this post is to teach how to use each delivery method and share my personal experience with each.
Insulin Delivery:
Syringe and Vile
When I was first diagnosed, I started out being taught how to use the syringe and vial method for insulin delivery. It was important to start out by learning this method because when moving to other insulin delivery methods in the future, the syringe and vial can be used as a back-up plan. I quickly got a hang of how to do this but I knew I didn't want to use this long term. Being 11 and 12 when I was using this method, I found it very embarrassing to do in public so it wasn't ideal for me.

Insulin Pen
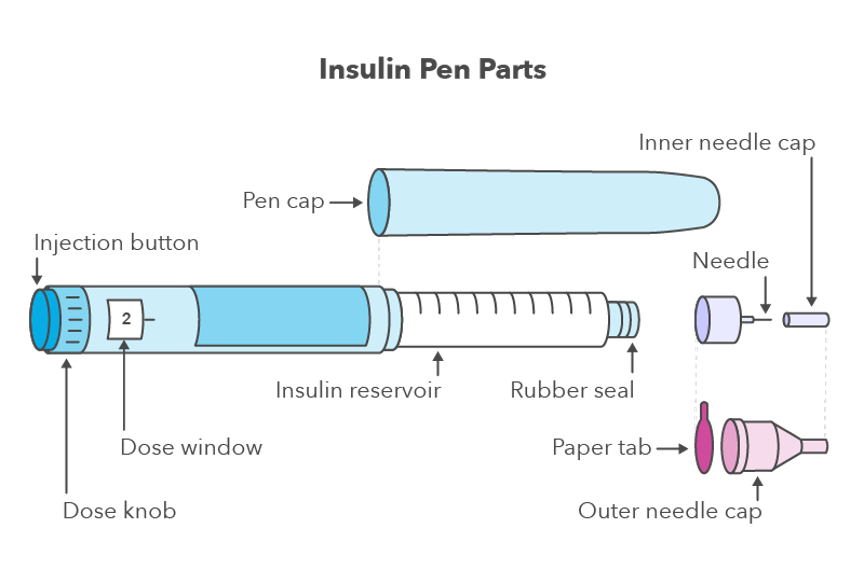
Next, I was moved to the insulin pen. The insulin pen is somewhat similar to the the syringe and vial but it is more user friendly. As shown in the picture below, the insulin pen has the same shape as a pen that you would write with. Instead of having to use a syringe and pull out the insulin manually, the pen uses a knob that lets you simply turn in order to choose how much insulin you need to receive. When you turn the knob on the end, it increases by 0.5 unit intervals of the total units that will be delivered. The total units will be shown in the dose window.
When you get the dose to the correct amount, you then simply screw a needle onto the insulin cartridge, uncap the needle, inject the needle into your abdomen, leg, arm, or lower back, and finally press the injection button and remove the needle. I found that this method was so much easier to use than the syringe. There was no need to remove air bubbles from the insulin every time you made an injection, there were less items to carry around, and it was a faster process.

Both of the above listed methods require two types of insulin. The first, which is the insulin being talked about throughout, is a short-acting insulin. Common brands include Humalog, Novolog, and Novolin along with many others. This insulin is absorbed rapidly and is used to correct for food and high blood sugars. This insulin starts working within 15 minutes which is why it is short acting. The second type is long-acting insulin. Common brands include Lantus, Levemir, and many others. This insulin is used to control blood sugar throughout the day, regardless of food or activity. This type of insulin works over a 24 hour period (normally) and is slowly absorbed by the body to maintain a steady blood sugar is no activity or food is eaten. In other words, it is the least amount of insulin you would need in a day with no activity or carbohydrates.
A video that further explains how to use an insulin pen is provided here.
Insulin Pump
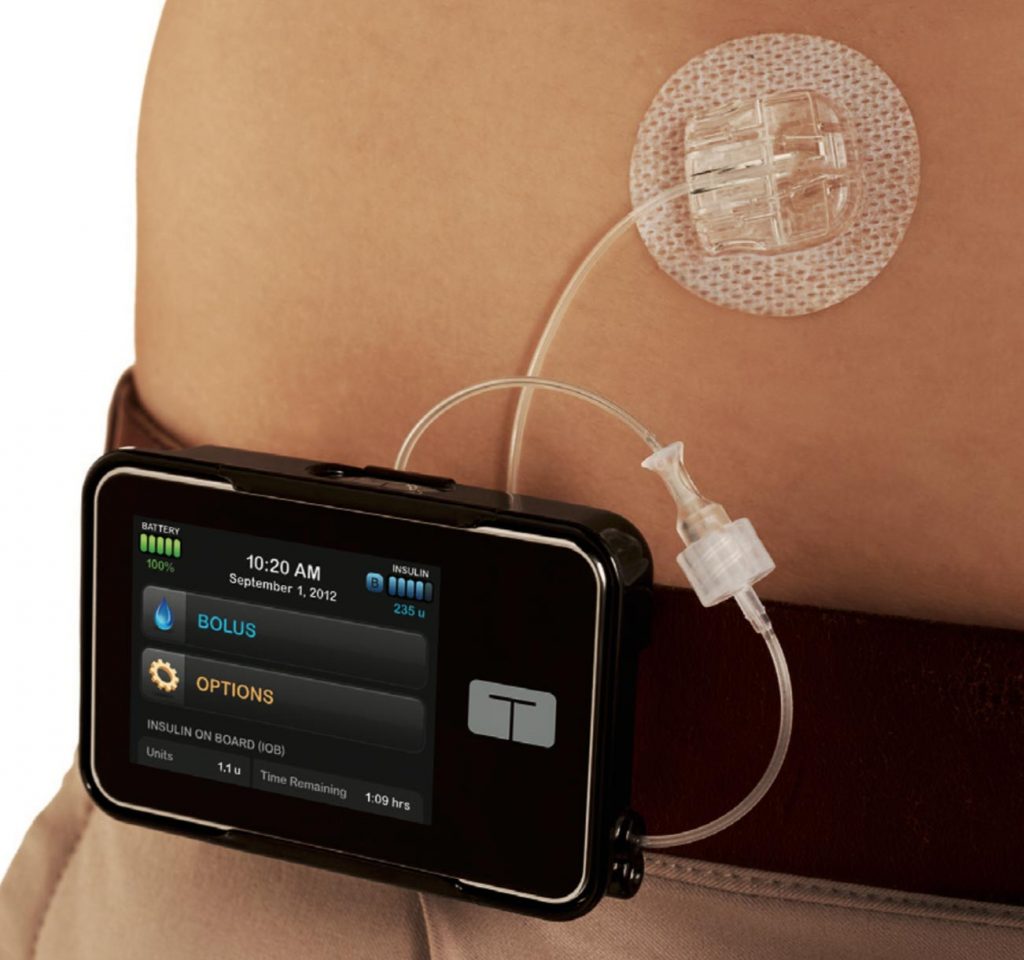
After the insulin pen, I was finally moved to the insulin pump (which is what I am currently using still). I personally use the T:Slim insulin pump but there are a handful of other brands as well. The insulin pump has been the most user friendly insulin delivery method available, in my opinion. The insulin pump is a lot more automated than the other methods. Before you start using your pump the first time, you need to enter information including your basal rate (how much insulin you get per hour based on the long-acting insulin you were getting), your insulin to carb ratio (how many units of insulin you receive for a certain number of carbs), your target blood sugar (what you want the pump to make corrections based on), and finally your correction factor (how many units of insulin you receive for how many points above your target blood sugar you are currently). These number aren't pulled out of thin air, but rather your endocrinologist will help you set up these numbers initially and small adjustments are made over time.
Also, no long-acting insulin is needed because the pump gives small amount of short-acting insulin throughout the day. This is the basal rate that was mentioned earlier. The pump is very small (smaller than the average cell phone) and have a line of tubing that the insulin travels through. At the end of the tubing, there is a connection piece that attaches to the site (the round sticker attached to the body in the picture below). The insulin travels from the pump, through the tubing, and into the site where it is injected into the body through the site. The site needs to be changed every 2-3 days or if it fails. There is a small plastic piece (called a cannula) that is always in your body throughout the 2-3 days.
1. Take the syringe and fill it with insulin. Followed by injecting the insulin into the cartridge.
note: I find I have less air bubbles later if before this step I take the unfilled syringe and pull air out of the cartridge before I fill it. This consists of sticking the syringe into the cartridge, pulling on the plunger to suck up air, then pulling the syringe out. I repeat this 3-4 times to get out as much air as possible.
2. Take the filled cartridge and put it onto the pump.
3. Screw the new tubing onto the cartridge.
4. Fill the tubing with insulin making sure there are no air bubbles left.
5. Put on a new site. Fill the cannula with insulin.
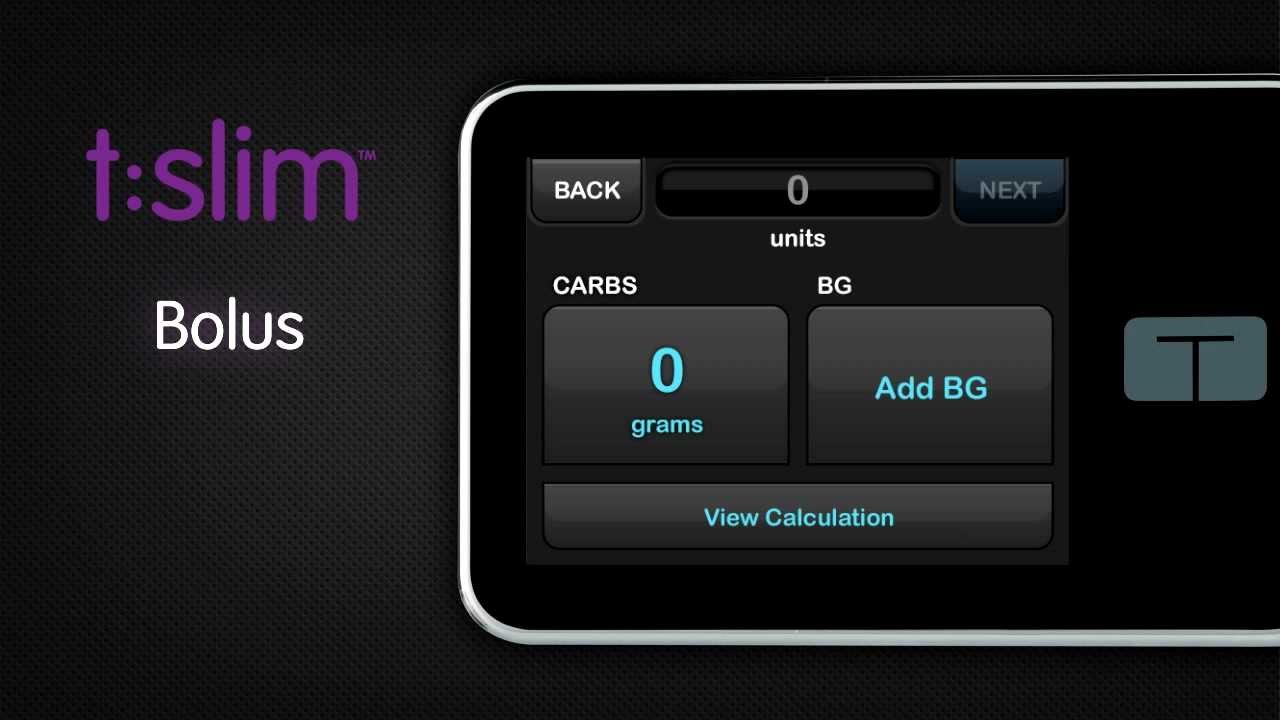
While there is a syringe involved with the pump, the benefit is that you only have to use it once during the 2-3 day period which is obviously less than multiple times a day. Once the pump is setup and loaded, it is ready for use! From here all you have to manually enter is how many carbs you eat and/or what your blood sugar is to give a correction. The menu looks like the picture below. On the left, you enter the amount of carbs you plan to eat, remember from before that we setup all the information the pump needs to calculate the number of units you need. So, we enter the carbs and enter the current blood sugar and the pump does all the work! This is definitely the most user-friendly delivery method I have used over my experience.
A link is provided to Tandem's youtube for videos on how to operate the pump, here.
If you have any questions about any of these insulin delivery methods or want more information about my experience with any of these methods, feel free to contact me! This is done by clicking the "Contact" link at the top of the page and filling out the form. Or you can always leave a comment below!
If you are interested in purchasing merch such as t-shirts, a mug, and a hat from DiabeticDecipher, use the link provided to view useful, everyday products branded with a logo made by DiabeticDecipher!
https://www.cafepress.com/diabetestalk

Comments
Post a Comment